Wir haben jetzt einen Sony DTC-1000ES und das Handbuch


von Gert Redlich im Aug. 2019 - Dieser Sony DTC-1000ES war also die Erstkonstruktion von den SONY DAT-Geräten, die zum Herbst 1987 auf den Markt kommen sollten.
Der weltweite Verkauf des DTC-1000ES wurde aber "angehalten", weil es da Probleme mit dem Copyright "hätte geben können". Die großen Platten-Labels "schossen" aus allen Rohren und waren in der Summe der Gemeinsamkeiten (ihrer erkennbar wegbrechenden Pfründe) stärker als SONY.
Nachtrag : Wir haben Ende 2019 einen der allerersten DTC1000 (gekauft in Tokio 1987) geschenkt bekommen und dürfen da jetzt unbegrenzt reinschaun. Der Link kommt weiter unten.
Für uns völlig neu, die Möglichkeiten der digitalen Zusatzinfos
Davon hatten die Entwickler bei TEAC, AKAI, PIONEER und MARANTZ nur geträumt, was mit digitaler Technik alles zu machen sei. Alleine die Uhr als Bandzählwerk mit Sekundengenauigkeit, das Wiederfinden von einzelnen markierten Stücken über Start-Markierungen, das war doch genial. Aus diesem Grund bilden wir hier erstmalig ein Benutzerhandbuch (sogar nur in englischer Sprache) ab, (wogegen ich mich fast 15 Jahre vehement gesträubt hatte.) Es gab da aber außer der völlig irren Qualität ein paar für uns Anwender völlig neue komfortable Eigenschaften, die waren mit den analogen CC-Kassettengeräten (und anderen) einfach nicht zu machen.
.
OPERATING INSTRUCTIONS - Table of Contents
| GETTING STARTED Overview... | 3 |
| Precautions... | 4 |
| Moisture condensation.. | 4 |
| Notes on installation.. | 4 |
| Installing batteries.. | 4 |
| Connections... | 5 |
| Description of the rear panel.. | 5 |
| Before connection.. | 5 |
| Basic connection diagram.. | 6 |
| Connection for playback using the DA converter unit.. | 6 |
| Connection when a CD player is connected directly to the DA converter unit. | 7 |
| Connection for digital-to-diqital dubbing. | 7 |
| Location and function of controls.. | 8 |
| Remote commander and operations. | 11 |
| USING YOUR DIGITAL AUDIO TAPE DECK | |
| Inserting a cassette.. | 12 |
| Recording... | 13 |
| Recording level adjustment.. | 14 |
| Writing the sub codes automatically during recording.. | 14 |
| Inserting a space between selections. | 15 |
| Playback.. | 16 |
| Locating the beginning of the selection. | 16 |
| Restarting playback after rewind. | 17 |
| Restarting playback from a particular portion after rewind... | 17 |
| Sub codes.. | 17 |
| Writing start ID... | 18 |
| Writing start ID automatically.. | 18 |
| Writing start ID manually.. | 18 |
| Writing start ID at the desired point. | 19 |
| Erasing a start ID.. | 19 |
| Writing program numbers.. | 20 |
| Writing program numbers automatically. | 20 |
| Renumbering program numbers. | 20 |
| Erasing a program number.. | 20 |
| writing skip ID.. | .21 |
| Erasing a skip ID. | .21 |
| Operation using sub codes.. | 22 |
| Locating the beginning of a desired selection. | 22 |
| Listening to the beginning of each selection successively.. | . 23 |
| Designating the desired selections. | 23 |
| Skipping an unwanted portion. | 23 |
| Blank section and no-signal recorded portion | .24 |
| Searching for the point immediately before the blank.. | .24 |
| Using the counter.. | 25 |
| When recording on a blank cassette or playing back a recorded cassette.. | 25 |
| When playing back a pre-recorded cassette (software).. | 25 |
| Digital dubbing.. | .26 |
| Timer recording/playback.. | .27 |
| Starting recording at the desired time. | .27 |
| Starting playback at the desired time. | .27 |
.
Anmerkung (zu den weggelassenen Absätzen):
Einige der hier aufgeführten Funktionen sind für unsere Betrachtung der technischen Neuerungen nicht so wichtig. Sie sind auch nur für diejenigen Leser interessant, die solch ein technisch überholtes Gerät (es war ja SONYs erstes DAT Modell) heute noch intensiv nutzen würden oder möchten. (Mehr dazu kommt auf der DTC-55ES BDA Seite)
.
Overview (Überblick über die Neuerungen von 1986/87)

Advanced digital audio technology was introduced into the consumer audio field through the Compact Disc player, currently in wide use throughout the world. And now, DAT (Digital Audio Tape) recorder, the "second generation" of digital audio recording equipment has been released. (Hier geht es zu der ersten Generation von digitalen Aufnahmen.)
.
- Excellent sound quality
By digitalizing and accurate processing of the (analouge) audio signal, the recording/playback is made with lower wow and flutter, wider dynamic range, lower distortion rate, and superb signal-to-noise ratio.
The audio signal is recorded and played back with the PCM (Pulse Code Modulation) system. For superior performance and higher fidelity, the four-times oversampling digital filter and D/A converter unit are employed for the left and right channels independently. - Smaller cassette (mit 3,81mm Band) - Das Band ist also gar nicht 4,0mm breit !!)
A small cassette of 73 x 54 x 10,5mm with a tape width of 3,81 mm, which was developed and standardized exclusively for the DAT format, is used with this deck. - Writable sub codes
"Sub code" is the coded signal written on the tape independently from the audio signal, and is mainly used for convenience and variety of playback or tape editing. In the DAT format, you can write and erase the information in this "sub code" area. - With this deck, the following sub codes can be written or rewritten without affecting the PCM audio signal section.
• Start ID* (code indicating the beginning of a selection)
• Program number (indicates the order of a selection)
• Skip ID (code for skip operation)
*ID stands for "identification". - High-speed search
By detecting the sub code, the desired points on the tape such as the beginning of the selection can be searched for at high speed. For details, refer to page 22. - Skip operation
During playback, if a skip ID has been written, the unit skips to the point where the next start ID is located, and playback starts again. - Digital IN/OUT jacks
When this tapedeck is connected to another DAT tapedeck having digital input and/or output jacks, tape-to-tape dubbing is possible with no deterioration in sound quality. When a DA converter unit (such as the Sony DAS-702ES or DAS-703ES) is connected to this digital output, digital sound reproduction will be enhanced. - Four DD (direct-drive) motors for higher reliability
A direct-drive motor is provided for capstan, head drum and supply/take-up reels respectively. These motors enhance the reliability and provide higher stability over extended periods of use. - Multi-functional counter
You can select the following information to be displayed:
• Linear tape counter
• Remaining time
• Elapsed playback time - Easy-to-read multi-mode display
The status and operation mode indications of the deck, such as sampling frequency, emphasis ON/OFF indicator, copy prohibit, and warning of the moisture condensation, etc. are concentrated in the large display window.
For details, refer to "Technical information" on page 30.
.
Hier ist die Reihenfolge geändert - zuerst kommt das DAT Band
Aus meiner Sicht sollte zuerst der Unterschied zwischen der Aufzeichnung auf der analogen 3,81mm breiten CC-Kassette und der ebenfalls nur 3,81mm breiten Digital-Kassette anschaulich dargestellt werden.
.
Technical Infomation (von Seite 30)
The technical development of the analog tape deck has progressed as far as its technology would allow in the improvement of the sound quality. In the search for even better sound reproduction, digital audio technology was developed.
With digital audio, an analog signal is encoded into a digital signal which consists of a stream of 0's and 1's. To keep the continuity of the sound signals which is essential for music, these separate digital signals are rearranged through a digital memory function.
Now that digital audio has been commercialized through the Compact Disc player, many audiophiles have experienced audio reproduction with wide dynamic range, low distortion and high signal-to-noise ratio not previously available.
To meet the demand for recording this remarkable sound reproduction, the technology of the CD have been applied to DAT. And by adding the signal error correction process to the digital track, an extremely stable and high-density recording has become possible.
The distinctive feature of the DAT as a new medium for digital audio is its digital recording capability by which you can digitally record desired selections by yourself. Moreover, writing sub codes which is convenient for playback is also possible.

- Der Umschlingungswinkel der Trommel beträgt nur 90°

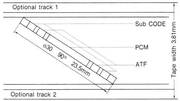
- Der Aufbau der Spuren auf dem Band, 2 Längsspuren und jede Menge Schrägspuren

High-density recording (von Seite 30)
To record and playback the digital signal encoded from the analog signal, a recording and playback system which ensures the frequency range of a few megahertz is necessary. This was impossible for the conventional multi-channel audio tape deck with stationary head. In order to solve this problem, the DAT deck uses a rotary head.
The DAT employs a 2-head system with the tape wrapping around 90°. The tape to be used is a metal tape. These factors allow you a recording density of 114 Mbit/inch2, ten times higher than that of the conventional PCM processor.
Structure of the DAT cassette :
• Designed to prevent contamination of the tape
• Dimensions: 73 x 54 x 10.5mm (2 7/8" x 2 1/8" x 7/16 inches)
• Safety tab with sliding mechanism.
.
.
- Anmerkung : In den nachfolgenden (späteren) SONY und anderen Prospekten und Handbüchern wird das doch etwas besser beschrieben.
.
Track format (von Seite 31)
.

- PCM area:
The PCM (pulse code modulation) sound signal is written in this area. - ATF area:
ATF (automatic tracking finding) signal is written, enabling a stable tracking performance of the rotating head. - Sub-code area:
Codes used for high-speed search operation etc. are written in this area.
.
With this deck, the start ID, the program number and the skip ID are available as sub codes.
.
und hier geht es weiter mit Seite 4 :
.
Precautions
1.) On safety und 2.) Moisture condensation
beides ist nicht mehr relevant
.
Notes on installation
Do not install the unit in a location near heat sources such as radiators or air ducts, or in a place subject to direct sunlight, excessive dust, mechanical vibration or shock.
Good air circulation is essential to prevent internal heat build-up in the unit. Place the unit in a location with adequate air circulation. Do not place the unit on a soft surface.
Conections (Seite 5)
Description of the rear panel

DIGITAL IN jack
The digital signal from another DAT deck or other digital source is input for digital recording. Connect this jack to the digital signal output of another DAT deck or other digital source.
LINE OUT jacks
Connect to the DAT or tape inputs of an amplifier. The playback signal of this deck will be output.
LINE IN jacks
Connect to the recording outputs of an amplifier. The signal from the source equipment connected to the amplifier is supplied to this deck.
DIGITAL OUT jacks
Outputs the digital signal reproduced by this deck. Connect this jack to the digital signal input of a D/A converter or another DAT deck.
.
- Anmerkung : Offensichtlich hatte das DTC-1000 keine optischen SPDIF-Buchsen.
- (SPDIF = SONY Philips Digital Interface).
.
Before Connection
.
- Turn off the power for all equipment before making connections.
- Be sure to insert the plugs firmly into the jacks. Loose connections may cause hum and noise. When unplugging, be sure to grasp the plug and not the cord.
- Connect the red plug of the supplied connecting cord to the right-channel jack (R) and the white plug to the left-channel jack (L) correctly.
.
Power cord
A white mark is visible on one lead of the power cord. This will help you drive the DAT deck and other components in the system "in phase" by aligning the AC power cord polarities with AC outlet polarities, so that the best possible sound quality is obtained. In most cases, the white-marked plug of the DAT deck should be inserted into the negative potential (ground side) of the wall outlet.
.
Connections (Seite 6)
Basic connection diagram

Setting of the input selector of the amplifier
Set the input selector of the amplifier to DAT when this deck is connected to the DAT input jacks, or to TAPE when connected to the TAPE input jacks.
Connection for playback using the DA converter unit

When this deck is connected to the external DA converter unit DAS-702ES or DAS-703ES (optional), you may enjoy the separate digital tape system.
.
Connection when a CD player is connected directly to the DA converter unit

Notes :
• Digital recording at sampling frequency 44.1 kHz (e.g. compact disc player) cannot be done.
• When recording, set the DIGITAL TAPE MONITOR switch of the DAS-702ES or DAS-703ES to OFF.
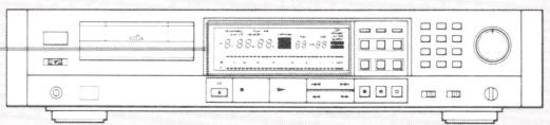
Location and function controls (von Seite 8 und Seite 9)

.
- Referenznummer [1] POWER switch
- Referenznummer [2] Cassette compartment
Insert a cassette with the window side up and the safety tab facing toward you. - Referenznummer [3] START ID buttons and indicators
Used to write and erase the start ID codes, and torenumber and erase the program numbers.
AUTO (automatic): Press to write the start IDautomatically during recording. When the recordinglevel returns to the fixed level after having been belowit for more than 3 seconds, the start ID is written onthe tape for 9 seconds.
MAN (manual): Press to write the start ID at thedesired point during recording. The MAN indicator lights. The start ID is written on the tape for 9seconds.
ERASE: Press to erase a start ID. When a start IDand a program number are written on the tape, both codes are simultaneously erased by pressing thisbutton.
RENUMBER: Press to renumber the programnumbers. When only the start IDs are written, pressing this button will insert program numbers. When this button is pressed, the tape is rewound tothe beginning automatically and program numbers are assigned from "1" in numerical order. - Referenznummer [4] COUNTER buttons
MODE: Changes the counter indication in the display window from the tape running time, to elapsed time of the selection, to total remaining time of the tape, and back to the tape running time again.
RESET: Resets the counter to "OM 00S".
MEMORY: Stores the point where the counter is reset in memory. - Referenznummer [5] SKIP ID buttons and indicators
WRITE: Press to write a skip ID onto the tape.
ERASE: Press to erase a skip ID which is written at the point just before the current position. - Referenznummer [6] Numeric buttons (0-9)
Press to designate the program number. - Referenznummer [7] REC LEVEL (recording level) controls
Adjust the recording level. The outer knob controls the left channel level and the inner knob the right channel level. - Referenznummer [8] TIMER switch
Normally set to OFF. Used to start recording or playback at the desired time using a commercially available audio timer. - Referenznummer [9] HEADPHONES jack (stereo phone jack)
- Referenznummer [10] Remote sensor
- Referenznummer [11] OPEN/CLOSE button and indicator
- Referenznummer [12] Tape operation buttons
STOP button
PLAY button
CUE (fast-forward/cue) button
REVIEW (rewind/review) button
AMS: Press to locate the beginning of the selection in reverse direction.
AMS: Press to locate the beginning of the selection in forward direction.
REC (recording) button
II PAUSE button: If the pause mode continues for about 10 minutes, it will be released automatically and the deck will enter the stop mode.
O REC MUTE (record muting) button - Referenznummer [13] CLEAR button
Used to cancel the selection number which has been entered mistakenly. - Referenznummer [14] SKIP switch
Set this switch to ON to skip during playback the selections coded with a skip ID code. Set it to OFF to play back the whole tape as it is. - Referenznummer [15] INPUT SELECT switch
ANALOG: For recording from the equipment connected to the LINE IN jacks on the rear panel.
DIGITAL: For recording from the equipment connected to the DIGITAL IN jack on the rear panel. - Referenznummer [16] START button
Starts playback from the designated selection or activates the music scan operation. - Referenznummer [17] PHONES LEVEL (headphones level) control
.
Display window (Seite 10) Referenznummer [18] - [32]
- Das war neu, ein Riesendisplay in der Mitte der Front

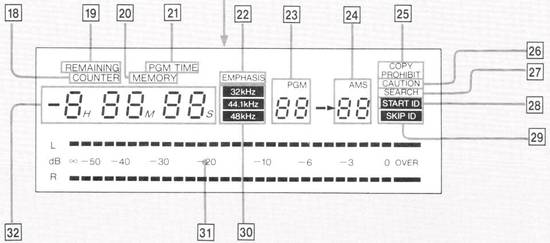
- und was es da alles zu sehen gab - das war für uns unglaublich

.
- Referenznummer [18] COUNTER indicator
Lights up to show that the counter is displaying the tape running time. - Referenznummer [19] REMAINING indicator
Lights up to show that the counter is displaying the remaining time. The remaining time is not displayed during search operation (the SEARCH indicator lights), fast-forwarding or rewinding. - Referenznummer [20] MEMORY indicator
Lights up when the MEMORY button is pressed to show that the " OM 00S" point is stored in memory. - Referenznummer [21] PGM TIME (program time) indicator
Lights up to show that the counter is displaying the elapsed time of the current selection. - Referenznummer [22] EMPHASIS indicator
Lights up when recording a digital signal input from the DIGITAL IN jack contains a pre-emphasized signal. In the playback mode, it also lights up while the detected pre-emphasized signal is being de-emphasized. - Referenznummer [23] PGM (program number) display
Shows the program number of the selection being played. - Referenznummer [24] AMS (automatic music sensor) display
Shows the number of selections to be skipped ahead or behind in AMS operation. When a numeric button is pressed, the display shows the program number of the target selection while the selection is being searched for. - Referenznummer [25] COPY PROHIBIT (digital copy prohibit) indicator
Blinks when the digital signal to be recorded contains a "digital copy prohibit" code. In this case, digital-to-digital recording cannot be done. - Referenznummer [26] CAUTION indicator
Blinks when moisture condensation occurs. If this happens, the deck stops automatically. - Referenznummer [27] SEARCH indicator
Lights up while a selection is being searched for. - Referenznummer [28] START ID indicator
Blinks when writing or erasing a start ID code, or when the start ID is detected during playback. - Referenznummer [29] SKIP ID indicator
Lights up momentarily when writing or erasing a skip ID code, or when the skip ID is detected during playback. - Referenznummer [30] Sampling frequency indicators
Indicates the sampling frequencies (32 kHz, 44.1 kHz, 48 kHz) with which the digital program is encoded.
44,1 kHz: For playback of pre-recorded DAT tape (Digital-to-digital recording cannot be done.)
48 kHz: For recording/playback with DAT tape - Referenznummer [31] Peak level meters
Indicate the level of the audio signal being recorded during recording, and the peak values of the audio signal recorded on the tape during playback. - Referenznummer [32] Counter
Displays the tape running time, elapsed time of the selection being played, and the total remaining time of the tape. Each time COUNTER MODE is pressed, the display mode changes in turn. (See page 25.)
.
Seite 10 Fernbedienung - Remote commander
Daß alle Fuktionen fernbedienbar sind, ist um 1986 selbstverständlich.
.
Inserting a cassette (Seite 12)

Anmerkung : Der DTC 1000 Recorder hatte noch eine Schublade wie die allermeisten SONY CD-Spieler.
When ± OPEN/CLOSE is pressed
The red lamp above the button blinks to show that the internal mechanism moves for several seconds. During blinking, none of the control buttons except PLAY functions.
Safety tab on the cassette
When recording is made, any previous recorded signal will be automatically erased. To prevent accidental erasure, set the safety tab to the position as shown in the figure on the right. To record on a cassette, make sure that the tab is set to the record-possible position.
Note
After the power is turned on, the II PAUSE indicator blinks. During blinking, none of the control buttons except ± OPEN/CLOSE functions.
Cassette care
• Unlike analog audio tape, the digital audio tape can be played back and recorded on only one side of the cassette.
• Do not attempt to disassemble the dust-resistant cassette casing.
• If you insert the cassette incorrectly, the cassette compartment closes and then opens again automatically.
• Never insert anything in the small holes on the rear of the cassette.
Recording (Seite 13)

.

- 1 Depress POWER.
- 2 Insert a cassette.
- 3 Adjust the recording level.
3.1) Press REC. (The # indicator lights up in red.)
3.2) Play the program source to be recorded.
3.3) While observing the peak level meters, adjust the level for both channels. (Refer to "Recording level adjustment".) - 4 Press PAUSE.
- 5 While pressing REC, press PLAY.
Three indicators light up and the deck enters the record-pause mode. - 6 Press PAUSE to start recording. The II indicator goes off.
.
When the tape is recorded to the end - The tape is rewound to the beginning and stops automatically. (Auto rewind function)
.
Recording level adjustment (Seite 14) Achtung : NEU
.
- Anmerkung : Hier steht es also explizit, denn das war völlig neu. Von den CD-Käufern hatte sich bislang niemand darüber Gedanken gemacht, wie diese digitalen CDs aufgenommen werden. Konträr zu den großen Bandmaschinen und den CC-Kassetten Geräten darf hier der Aufnahmepegel um keinen Preis der Welt übersteuert werden. Hier steht es ganz genau :
.
Adjust the recording level with REC LEVEL so that the peak level meters do not exceed the 0 dB point at the highest level.
If the meters exceed 0 dB, the OVER indicator lights in red. If the indicator lights up steadily, lower the recording level to avoid distortion of the recorded sound.
A little practice and experience will allow you to set the optimum recording levels.
.
Playback (Seite 16)

.
- 1 Depress POWER.
- 2 Insert a cassette.
- 3 Press PLAY.
.
Playback begins.
.
To stop playback
To fast-forward or rewind the tape while listening to the sound - Cue/review
Locating the beginning of the selection
For this operation, start ID codes must have been entered previously. Using AMS buttons the beginning of the desired selection on the tape can be located quickly. For details, refer to "Locating the beginning of the selection (AMS)" on page 22.
.
Headphone level adjustment
Adjust the headphone level with PHONE LEVEL.
When the tape reaches the end
The tape is rewound to the beginning of the tape and stops automatically.
Important
Since the digital audio tape boasts a wide dynamic range, the peaks of high level inputs are recorded with high fidelity, and the noise level is very low.
Do not turn up the volume while listening to a portion with no audio signals or very low level inputs. If you do, the speakers may be damaged when a peak level portion is played.
Restarting playback after rewind - Auto play
With this function the deck starts playback automatically from the beginning of the tape after rewind.
.
Subcodes (der Begriff war für uns völlig neu)

Da in dieser Bedienungsanleitung die technischen Erklärungen ganz am Ende standen, standen die meisten Wißbegierigen erst mal "auf dem Schlauch". Was ist denn das nun schon wieder ? Muß ich das alles lesen ?
.
In the DAT deck, "sub code" signals can also be written on the tape in addition to the audio signal. Using the sub codes, you can easily cue the selections and edit the tapes. These sub code signals can be written during recording or during playback after recording has been made. In playback, the sub code signals can be freely erased or re-written with the previously recorded audio signals left as they are.
Sub codes available with this deck
Functions of each sub code in playback
Start ID (code indicating the beginning of the selection)|
• Location the beginning of the selections (AMS)
• Music scan Program number (indicating the selection order)|
• Searching for the selection by designating the selection number Skip ID (code for skip operation)|
• Unwanted portions can be skipped
.
Der DTC 55ES hatte dann noch mehr unterschiedliche Sub-Codes.
.
Hier ein paar Absätze in Kurzform :

Writing start ID
"Start ID" is the code indicating the beginning of a selection. You can easily locate the selection in playback using the start ID codes written on the tape. To write start ID codes, two methods are available: automatic writing during recording and manual writing during recording or playback at the desired points. While the start ID is being written (for 9 seconds), none of the buttons except STOP and OPEN/CLOSE is operable.
Writing skip ID
When the skip ID code is detected during playback, the tape skips to the next start ID code. The skip ID can be written during both playback and recording. Skip ID does not affect the audio signal recorded.
If there is a portion you want to skip later, press SKIP ID WRITE at the beginning of that portion. The skip ID signal is written for approx. one second automatically from the point where the button is pressed. While the skip ID is written, the WRITE indicator and the SKIP ID indicator in the display window light up.
.
Ein ganz wichtiger Absatz zum Verständnis :
"Leer" und "Leer" kann unterschiedlich sein !
Unterschiedlich : Blank section and no-signal record portion
In the digital tape recording format, the recorded area is definitely distinguished from the "blank" section (the tape portion on which no recording has been applied ever). Unlike the "blank" section, a track format is constructed on the recorded area, even if no audio signal is recorded.
.
- Anmerkung : Auf dem Magnetband ist nach dem Auspacken zuerst mal "überhaupt nichts" drauf, auf den analogen 1/4 Zoll bis 2 Zoll Bändern und 3,81mm CC-Kassetten wie auch auf den 3,81mm DÀT Bändern. Das Band ist physikalisch "unmagnetisiert". Beim DAT-Band wird das geändert.
- Selbst wenn Sie kein Signal einspeisen oder den Regler ganz auf 0 drehen und dann die Aufnahmetaste drücken, wird ein Zeitcode auf das Band geschrieben. Für uns als Anwender ist das Band dann zwar immer noch akustisch "leer", aber nicht mehr für den Prozessor im DAT-Gerät. Das passiert auch nur beim allerersten Aufnehmen und sollte nicht ignoriert werden.
.
When both blank section and no-signal recorded portion exist on a tape :
Search operations using AMS function, for example, may take a quite long time. Therefore, when recording from the middle of the tape such as editing the tape, make sure that no blank section will be left on the tape. If no-signal portions are required between selections, use the record muting function (refer to page 15).
- Anmerkung : Es sollten also keine "Zwischenpausen" übrig bleiben, auf denen kein solcher Zeit-Code drauf ist :
To leave no blank section on the tape
Start recording from the position immediately before the "blank" section. The blinking sampling frequency indicator in the display shows that the tape reaches the "blank" section.
.

Searching for the point immediately before the blank (Blank search)
1 Press the numeric button "0".
2 Press START.
The sampling frequency indicator blinks in the display window, and the "blank" search operation starts at a high speed*), the tape stops at the beginning of the "blank" section.
*) When the blank search operation starts from the point within a recorded area, the tape is advanced in normal fast-forwarding speed. When the blank search operation starts from the "blank" section, first the tape is rewound at a three-times the normal playing speed to return to the end of the recorded area, and then stops.
Using the counter (Seite 24) - sekundengenau !
.

- Anmerkung : Das war auch neu. Die ASC 6000 Bandmaschine hatte bereits einen Minutenzähler, der aber von der Drehung eines großen (mitlaufenden) Rades mit zwei Lichtschranken erzeugt wurde. Das war für uns toll, aber es war im Verhältnis immer noch ziemlich ungenau.
- Durch den auf dem Band befindlichen unveränderlichen Zeitcode geht das jetzt sekundengenau, immer und auch nach 100 Mal abspielen oder Aufnehmen.
.
The time counter display shows the fallowings:
- • Tape running time
- • Elapsed time of the selection
- • Total time remaining on the tape
Each time the MODE button is pressed, the information will be switched.
.
Digital dubbing - die gefährlichste Funktion für die DAT-Gegner
When two DAT decks are connected to each other, digital-to-digital tape dubbing is possible. When the start ID and skip ID codes are written on the playback tape, they are transferred to the recording tape as they are.
The recording level is also set at the same condition as the playback tape. However, program numbers are not transferred to the other.
- Anmerkung : Hier steht es. Jede weitere Kopie ist völlig baugleich und qualitativ absolut gleich - wie das Original. Das war natürlich eine fatale Eigenschaft für die gesamte in ihren Erträgen versinkende Musikindustrie. Diese arrogantgen und überheblichen Menschen machten sich um 1986 herum überhaupt keine Gedanken, daß die digitale Welt doch beim DAT-Recorder nicht Halt machen würde. Die beschreibbare CD hat sie dann wenige Jahre später voll umgehaun. Und mit den USB-Sticks und Online-Musik waren deren analoge Traum-Welten dann völlig zusammengebrochen.
.
- 1 Set INPUT SELECT to DIGITAL.
The START ID AUTO indicator goes off. - 2 Insert a recordable cassette.
Be sure to set the safety tab to its record-possible position. - 3 Set the deck to the record-pause mode.
Press PAUSE, then press PLAY while pressing REC.
When recording sub-code signals from the beginning:
• For the start ID (when it is not written on the playback tape) - Press AUTO (page 18).
• For the program number - Designate the first number with numeric button(s) (page 20). - 4 Insert the original cassette for playback.
- 5 Search for the recorded section to be dubbed.
- 6 Press PAUSE of the recording deck
to release the record-pause mode, and at the same time, press PLAY on the playback deck.
.
Dubbing begins.
Und hier wieder der Verweis auf bessere externe Wandler
When the signal has already been recorded in the front part of the tape
Search for the "blank" section using the blank search function
(page 24).
- Press "0" then START.
When the COPY PROHIBIT indicator blinks
When a pre-recorded (software) tape is used for digital dubbing, the COPY PROHIBIT indicator may blink on the recording deck to show that the contents of the tape loaded in the playback deck cannot be used for digital (digital-to-digital) dubbing, as a "copy prohibition" code is written on the prerecorded tape.
Playback equipment
Other than this DAT deck itself, the DA converter unit DAS-702ES or DAS-703ES is available for digital recording operation.
.

- Anmerkung : Diese beiden D/A Wandler waren einmal zu der Zeit um 1986 das Feinste, das SONY aus dem professionellen PCM Bereich entnommen hatte und in Consumer taugliche Gehäuse gebaut hatte. Der mechanische und elektronische Aufwand war für 1986 erheblich.
- Es ist aber nichts mehr so, wie es mal war !
Daß auch hier bei den D/A Wandlern die Entwicklung in den 30 und mehr Jahren nicht halt gemacht hatte, wollen nur verbissene ebay Gaukler den leichtgläubigen Bietern vorgaukeln. Die alten Wandler vom Typ DAS-702ES or DAS-703ES aus 1986 sind nämlich genauso veraltet wie die allerersten CD-Player von 1982/83.
.
Damit ist unser Einblick in die Anfänge der DAT Welt fertig.
Und natürlich hat SONY einiges absichtlich vergessen ....
Bei jedem DAT-Recorder dreht sich - wie beim Video-Recorder - eine (kleine) Kopftrommel, die die beiden Magnetköpfe enthält. Und diese Köpfe verschleißen natürlich auch (irgendwann). Bis zu diesem frühen Zeitpunkt (etwa 1989) gab es überhaupt keine verläßlichen Informationen über die Abnutzung bzw. die Lebensdauer eines DAT Laufwerkes.
Mit den DDS Band-Kassetten (Digital Data Storage), die nochmal eine qualitative Stufe besseres Band-Material hatten, hatten wir ab 1998 keine guten Erfahrungen mehr gemacht. Die 4 Gigabyte DDS Bänder liefen nur 2 bis 3 mal, dann stellte das Laufwerk seinen Betrieb ein und verlange neue "Ware".
Bei den CD-Playern war und ist es übrigens genauso. Die Lasereinheiten, die ja angeblich verschleißfrei abtasten, haben eine erstaunlich kurze Lebensdauer und - das ist schlimm - es gibt keinen Ersatz mehr. Die CD-Spieler kann man getrost entsorgen - auch eine fatale Entwicklung.
.
Ein Blick noch in : "Toubleshooting guide"
| Symptom | Cause (and remedy) |
| The function buttons will not operate. | For 4 seconds after the power is turned on, the buttons do not activate. Wait until the blinking of the II indicator goes off and then try again. |
| The tape operation buttons will not operate. | While writing the start ID (9 seconds), buttons except for ¦ STOP and ± OPEN/CLOSE buttons will not operate. |
| The cassette is rejected after being loaded. | The cassette is inserted incorrectly. |
| The ?, ?? and ??! buttons will not operate. | If the tape is wound completely, press <+< or h*^ |
| The following buttons will not operate: REC, START ID, SKIP ID and RENUMBER. | The tab of the cassette is open. (See page 12.) |
| The tape does not move. | The II PAUSE button is activated. |
| The CAUTION indicator appears suddenly while the tape is running. | Defective or damaged cassette is inserted. While the ± OPEN/CLOSE button is blinking, press this button and try another cassette. |
| The tape stops running before reaching the beginning of the tape. | If MEMORY indicator is displayed, press the COUNTER MEMORY switch so that the indicator goes off. |
| The tape running noise is heard during fast forward or rewind. | This may happen depending on the type of tape used. |
| No recording can be made. | If the tape is wound completely, press M< or h^4 button to rewind. |
| The tab of the cassette is open. (See page 12.) | |
| Nothing is connected to the DIGITAL IN jacks, although the INPUT SELECT switch is set to DIGITAL. | |
| Digital recording is to be made at the sampling frequency of 44.1 kHz. The COPY PROHIBIT indicator appears and the deck enters the recording pause mode. In this case, recording cannot be made. | |
| Recording cannot be made, even though the unit was set in record mode. | Nothing is connected to the LINE IN jacks on the rear, although the INPUT SELECT switch is set to ANALOG. |
| The recording level is turned down completely. | |
| Recording or playback cannot be done. | Incorrect connection. (See page 5.) |
| Incorrect operation of the connected amplifier. Refer to the operating instructions of the amplifier. | |
| Unbalanced left and right volume. | Incorrect adjustment of the recording level. |
| Search function activated suddenly. | The SKIP switch is set to ON. |
| Search speed becomes slow. | There is a blank section between selection. Use the blank skip function when recording so that no blank is created. |
| Search function does not activate. | If the start ID is less than 9 seconds long, erase it, and then write it again. |
| The portion between start ID codes is less than 18 seconds long. It may occur when writing start ID manually. | |
| If the selected program number does not exist on the tape, or the entered number is out of order, press the RENUMBER button. | |
| Start ID cannot be written during recording. | A new start ID cannot be written for 9 seconds after another start ID. |
.
Die "Specifications" des DTC-1000ES von 1987:
| System | Digital audio tape recorder |
| Tape | Digital audio tape |
| Recording system | Rotary head |
| Recording time | 120 minutes (with DT-120) |
| Tape speed | 8.15 mm/s |
| Drum rotation | Approx. 2,000 rpm |
| Error correction | Double Reed Solomon code |
| Number of channel | 2 channels, stereo |
| D/A conversion | 16-bit linear |
| Frequency response | 2-22,000 Hz ±0.5 dB |
| Signal to noise ratio | More than 92 dB |
| Dynamic range | More than 90 dB |
| Total harmonic distortion | Less than 0.0055% |
| Wow and flutter | Below measurable limit |
Die Anschlüsse
| Input | ||||
| Input jacks | Jack type | Impedance | Rated input level | |
| LINE IN DIGITAL | Phono Phono | 50 kohms 75 ohms | -10 dBs 0.5 Vp-p | |
| Output | ||||
| Output jacks | Jack type | Impedance | Rated output | Load impedance |
| LINE OUT | Phono | 470 ohms | -10 dBs | More than 10 kohms |
| HEAD- | Stereo | 150 ohms | 0-28 mW | 32 ohms |
| PHONES | phone | |||
| DIGITAL OUT | Phono | 75 ohms | 0.5 Vp-p | 75 ohms |
Nachtrag aus 2020 zum Digital "IN" Limit
Im User-Manual ist nichts davon zu lesen, daß man zwar den Digital-Ausgang des CD-Spielers mit dem Digital-Input dieses DAT-Recorders verbinden kann, aber der Recorder das Signal gar nicht aufnehmen kann. Der SPDIF Eingang konnte nur 48KHz und der CD Player gibt/gab die digitalen Daten nur mit 41kHz aus.
Erst auf der Rückseite dieses allersten Prospektes aus 1987, das uns im Januar 2020 auf denTisch kam. steht es haargenau zu lesen.
.
| Tape | |
| Track pitch | 13.6um (20.4um) |
| Sampling frequency | 48 kHz, 44.1 kHz, 32 kHz |
| Modulation system | 8-10 Modulation |
| Transfer rate | 2.46 Mbit/sec. (before modulation) |
General
Power requirements
Model for European countries 220 V AC, 50/60 Hz
Model for the United Kingdom 240 V AC, 50 Hz
| Power consumption | 48 W |
| Dimensions | Approx. 470x100x420 mm (w/h/d) (18y2x3l5/l6x16y2 inches) incl. side wood |
| Approx. 430x100x420 mm (w/h/d) (16l5/l6x3l5/l6x16y2 inches) excl. side wood | |
| Weight | Approx. 12 kg (26 lb 7 oz) incl. side wood |
.
Nachtrag zu diesem Dokument :
SONY DIGITAL AUDIO TAPE DECK
Dokumenten ID : 3-765-649-11 (1) - C 1987 by Sony Corporation
We are sure that you are satisfied with the sound quality and operating performance of out compact and functional DAT deck.
Warning
To prevent fire or shock hazard, do not expose the unit to rain or moisture. To avoid electrical shock, do not open the cabinet. Refer servicing to qualified personnel only.
.
.