7 Analogue tape reproduction
7.1 Preliminary remarks
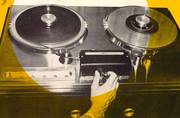
So far, we have concentrated upon reproducing discs and cylinders recorded by the process of cutting a groove. In this chapter I shall be dealing with the special problems of reproducing analogue magnetic sound recordings. I use the generic term “tape” for all the media, although they include some types of discs, and (in the case of endless-loop tapes) the geometry may be topologically equivalent to a cylinder. Most of my points also apply to the magnetic soundtracks accompanying ciné film and videotaped pictures, and to wire recordings, so my word “tape” will include those as well.
Also, like grooved media, the majority of audio recordings are “baseband”, directly accommodating frequencies heard by a human ear (approximately 20 Hertz to 20 kiloHertz). “Hi-fi” video soundtracks are the principal exception, apart from very specialist analogue machines for recording such things as dolphins and bats.
Probably the first point should be “Use a Good Tape Reproducer.” This is something which is difficult to define, of course, especially since it seems probable that slow but sure developments will occur in the next few years. Fortunately, it is not difficult to define the performance of a “good tape reproducer” in engineering terms, and your archive should have its machines tested and calibrated until they reach the highest standard. They will then be better than most of the machines which made the original tape recordings, so you will recover the power-bandwidth product without losing anything very significant.
The raw electronics (in “play”, but without the tape moving) should have a basic background noise at least ten decibels lower than the noise with blank tape moving. The wow and flutter should be less than 0.05 percent weighted on professional formats, and certainly no more than 0.1 percent on domestic formats (this figure is difficult to achieve). The replay frequency-response should match that of a standard calibration tape within plus or minus half a decibel at all the frequencies on the calibration tape, and should do nothing drastically wrong (e.g. have a peak, or a rolloff greater than 6dBs) for an octave either side of those frequencies. The total harmonic distortion on replay should be less than 0.2 percent at all relevant signal levels. (This test is achieved by injecting a magnetic field into the replay head from a figure-of-eight-shaped air-cored coil fed from a power amplifier). It is a lot to ask; but it represents the state of the art for present-day magnetic tape recorders, so it should be easier to exceed this specification in future.
And I must also ask you to be aware that there is always “more in the tape” than we can recover with today’s techniques, as we saw in Reference 3 of section 2.8. Thus you should keep the originals in anticipation that more may be recoverable in future. Today it is normal to post a cassette into a machine or load a reel upon a tape recorder, press the PLAY button, and when recognisable sounds come out we give the matter no further thought. Unfortunately, if we are aiming to reproduce the “original sound” (as mentioned in the Introduction), we must make a great number of checks to ensure we are doing justice to the tape. If we get things wrong, the effect is usually rather subtle - we may not know anything is wrong by casual listening - but, as good archivists, it is our duty to perform these checks. If we copy the recording to another medium 163
without making the checks first, we are likely to lumber the people who inherit the copy with a large number of question marks.
From the earliest days of magnetic recording, people were worried by not being able to see the sound waves, which had always been possible on disc or film. People were also worried that the magnetism might “fade” with time. Therefore professionals have always made use of line-up tones, recorded at the start of each session to document the performance of the recording machine and of the tape. Such tones may serve to fix the overall sensitivity, the frequency response, and the track identification in the case of stereo tapes. Unfortunately there are no standardised procedures. What I shall be saying in this chapter would be largely unnecessary if every tape carried a set of line-up tones. Unfortunately, bitter experience has shown that we frequently have to work out the levels, the frequency responses, and the track identifications for ourselves. If you come across tapes like this (and everyone does), this chapter will help you nail things down so you will be less likely to make a mistake in restoring the original sound.
I shall therefore relate some points in the history of magnetic recording, and then consider the checks we must perform one-by-one. You do not have to learn all this. It is a reference manual, so you can easily refer to it as-and-when you need. But I advise you to read the whole thing through once, so you know the nature of the checks you need to carry out.
If you are an experienced operator, I don’t expect you to read it all; instead I shall briefly summarise it by telling you the subject-headings: “Bias”, “Magnetised Heads”, “Print-Through,” “Azimuth”, “Standard Equalisation Curves”, and “Track Layout Geometry”. The special problems of Noise-Reduction Systems are left until Chapter 8, because they apply to other media besides tapes.
7.2 Historical development of magnetic sound recording
There were two principal problems which faced the earliest workers in magnetic sound recording, and until they were solved, the idea remained a laboratory curiosity with low quality.
The first problem was lack of amplification. Even the most heavily-magnetised recording played by the most efficient playback-head gave a very weak electrical signal, barely enough to be heard in an earpiece, and quite insufficient for a loudspeaker. Only when radio receivers using thermionic valves became available did the cost and feasibility of electronic amplifiers result in success for the medium. Nowadays, electronic amplification is so commonplace that we hardly notice it, and the difficulties for the pioneers are almost forgotten. As there are no difficulties in principle today, I shan’t consider the amplification problem further.
The other problem has not been completely solved in the analogue domain (and probably never will be). Digital techniques are needed to circumvent it. That problem is the non-linearity of all permanent magnetic materials. By this, I mean the following. As you probably know, a magnetic field can be generated by a current flowing through an electrical conductor. (In practice the conductor is usually wire, and the shape found most effective is when the wire is in a coil, so I shall assume these points from now on). The magnetism generated is directly proportional to the current; but if we try to store the magnetism in a permanent magnetic material, we find that the strength of the stored magnetism is not directly proportional to the “inducing” magnetism. Indeed, the “transfer characteristic” is always a very odd shape. (See Box 7.2)
BOX 7.2 THE “B-H CURVE”.
Suppose that the aim is to record the effect of a gradually increasing electric current, for example at the start of a sound wave. As the current begins to flow, permanent magnetic materials resist the magnetic effect (which is natural enough, or they wouldn’t be permanent magnets). Only when the inducing current reaches a certain strength does the permanent magnetic material start to respond by taking up some of the magnetism itself.
After that, it absorbs magnetic energy quite efficiently, and indeed its strength rises more rapidly than that due to the coil. This cannot go on for ever of course; as the current in the coil increases, the magnetic material “saturates”, and its response slows down again until the material has accepted all the magnetic energy it can. No matter how much more current flows in the coil, the material cannot take any more magnetism. (We may say “The tape is overloaded.”)
In practice, sound waves represented as electric currents in wires “alternate”; they go up and down in strength. The stored magnetism - hereinafter called “the remanent induction” - suffers further problems when the current in the head starts to fall again. We now have a saturated magnetic tape, and if it is doing its job as a magnetic store, it will resist the effect of the falling current. The electric current not only has to fall back to zero before the material responds significantly, but is actually obliged to flow in the opposite direction before the remanent induction can be pulled back to zero.
Physicists describe the inducing field with the letter “H” and the remanent induction with the letter “B.” When the transfer characteristic is plotted on a graph, it is called a “B-H Curve.”
When the electrical engineer H. P. Hartley investigated this in the 1920s, he invented a new word to describe the way the permanent magnetism lagged behind what the induction field was doing. He called it “hysteresis”, and the term is now used by electronic engineers for any form of cyclic delay, from electromagnets to expense accounts!
The effect upon sound quality is drastic. Even with modern magnetic materials, we get gross distortion of the recorded waveform, so bad as to make human speech practically unintelligible. The problem did not affect the very first Poulsen Magnetophones of 1898, because they were intended for morse signals. (Which proves that digital magnetic recording antedated analogue magnetic recording!) Speech recording only became feasible when Poulsen later discovered the principle of Direct-Current Bias.
7.3 Bias
The solution to hysteresis distortion is “bias.” Bias means another signal added to the recording current; so far there have been two forms, “D.C. Bias” and “A.C. Bias.”
“Direct-Current Bias” (which is now obsolete) consisted of adding a direct (i.e. steady unidirectional) electric current to the recording-head. Or, what came to the same thing, a weak permanent magnet might be fixed on the recording-machine adjacent to, or inside, the recording coil. This overcame the first problem of the hysteresis curve, its inability to take on the initial rise in current. Indeed, we actually get an amplifying effect, because once this initial problem is overcome, the tape accepts magnetism more readily than the inducing current can supply.
The principle was described thus by Poulsen and Pederson in their 1903 patent: “For rendering the speech more distinct and clear, a continuous polarization current is employed which is led round the writing magnet so as to produce a vibration of the molecular magnets of the speech carrying wire at the moment when they store the speech whereby the clearness thereof is increased.” (Ref. 1). It was still necessary to hold the loud signals down in volume to prevent saturation, but DC bias certainly eliminated the worst effects of hysteresis distortion. It was used by nearly all magnetic recording machines until the second World War, and was continued on cheap open-reel and cassette machines until at least the 1970s.
Sometimes two permanent magnets were used: one powerful one to erase any pre-existing sounds, then a weaker one magnetised in the opposite direction to bias the tape to its mid-point. In this way, both erasure and bias were achieved without consuming electric current.
The great disadvantage of DC bias was that all the tape was magnetised (whether it was carrying sound or silence), and this meant high background noise. Minute irregularities in the motion of the tape were interpreted by the playback head as sound, and were reproduced as a hissy roar. Furthermore, edits were always accompanied by loud thumps.
“A.C. Bias” was discovered accidentally by some workers in the United States in the 1920s. Their recording amplifier developed an accidental radio-frequency oscillation, and suddenly the recording was almost cured of distortion and background noise. Although their discovery was patented, it was not used commercially. It was rediscovered by German workers during the second World War, and the Allies listening to German radio broadcasts suddenly realised the Nazis had a new high-quality recording system.
In fact, the Germans had combined the “A.C. Bias” invention with the invention of plastic-based ferric-oxide tape. The latter had been demonstrated at the Berlin radio show in 1935, but it was the combination of the two which gave the great step forward.
The principle of A.C. Bias is that an ultrasonic electrical oscillation is added to the signal in the recording head. The frequency of the signal is four or five times that of the highest wanted sound, and cannot be heard. Instead, it “shakes up” the magnetic particles so they can accept the magnetism more linearly, and as the particles are carried away from the head by the tape transport, the effect of the bias gradually dies away. Gaps between sounds result in ‘unmagnetised’ tape while sounds mean magnetism of the correct strength. Thus low background-noise and low distortion are achieved at the same time.
I shall now describe in words how the addition of ultrasonic bias affects the recorded quality. I do so because you will often come across old tapes which were incorrectly biassed, and you should be able to recognise the symptoms. There’s not a lot you can do about them, but the symptoms can be confused with other faults, which is the reason for mentioning them.
For my description, I shall assume you have a “three-headed machine” (that is, an analogue tape recorder with separate heads for erasing, recording, and replaying), and that you are listening to the playback immediately after the record-head. I shall also assume it is a conventional recording head, carrying both the recording signal and the bias, and not a “cross-field” system in which there are two separate heads either side of the tape, one for the audio and one for the bias. I shall also assume that the machine is set up correctly in all its other parameters, and that you have your finger on the bias control, starting with the bias wound right down.
If this setting of the control results in no bias at all (actually most circuits give a little bias even with the knob right down), you will of course hear the characteristic hysteresis distortion I mentioned in the previous section.
As the bias is increased, the gross distortion diminishes. But the level of ultrasonic bias effectively dies away as the tape moves away from the head, and it has the same effect as a weak erasing signal. This affects the high-frequency content of the recorded sound more significantly than the low-frequency content. If the machine’s equalisation has been correctly preset, you will hear too much treble at low bias settings, and too little treble at high bias settings.
The sensitivity of the tape also varies with the bias. It is difficult to judge the effect on actual sound, because the different effects of distorted treble and sensitivity confuse the ear; but with pure tones, the sensitivity (as shown by a meter connected to the playback amplifier) rises to a maximum and falls again as the bias is increased.
The ultrasonic bias also affects the background noise of the tape, and again it is difficult to judge the effect on actual sound. Earlier, I said that the system meant unmagnetised tape during silences; I must now confess this was an oversimplification. In fact, the bias causes the individual magnetic domains to be randomly aligned at the surface, but confined to parallel layers the deeper you go into the tape. The effect varies somewhat with the design of the recording head, but the lowest background-noise is achieved with the bias not set for minimum distortion; it comes with rather more bias.
And, if this weren’t enough, the point of minimum distortion isn’t precisely the same as the points of maximum sensitivity or minimum noise. Thus, it is necessary to do a trade-off between three variables in order to bias a tape correctly.
This isn’t a chapter on recording techniques, it is supposed to be about reproduction; but I cannot leave you in suspense! What modern operators do is as follows. As I said earlier, A.C. bias has a partial erasing effect at high frequencies. But if a particle of dirt should get between the tape and the head, forcing the tape away from the head by a microscopic amount, two of the parameters can be made to cancel each other. The tape receives less bias, so the treble goes up; and the tape receives less audio from the recording-head, so the treble goes down. So a bias setting is chosen in which these two effects cancel, and the results are therefore much more consistent in the real world of dust-particles.
The practice for ferric-oxide tape is as follows. The bias is first adjusted to give maximum sensitivity at a high audio frequency (say 10 kHz), but then it is increased further so that the output due to partial-erasure at this frequency falls by about 2 dB at 38 centimetres per second, or 4 - 5 dB at 19 centimetres per second. (The exact figures are specified by the tape manufacturer, so operators do not have to go through the business of measuring the three parameters on each type of tape). With this setting, the high-frequency response is usually consistent in the presence of dirt. The equalisation in the recording amplifier is then adjusted to compensate for the fixed high-frequency losses due to the tape-head, the tape, and the partial-erasure effect; and the other parameters are left to look after themselves.
I shall now outline the effects when the bias is grossly misaligned, because this is a frequent problem on old recordings made on amateur machines which haven’t been expertly maintained throughout their lives.
Low bias gives excessive treble in the sound on the tape, accompanied by a certain amount of harmonic distortion. This situation usually only arises when there is a severe head-clog, or when a new formulation of tape (requiring more bias) is recorded on a machine intended for an older formulation.
Too much bias means too little treble, but practically no distortion on low-pitched notes. However, the high frequencies are often distorted quite badly, and the subjective effect is known as “S-blasting”. The sibilants of speech, for example, are accompanied by low-frequency thumps. This is a very common cause of trouble. As an old-style tape-head wore away, less bias current was needed, because there was less metal remaining; and often such wear was accompanied by an increase in the tape-head gap, so high frequencies also suffered because the magnetism could change significantly as the tape passed across, resulting in another form of distortion. Nowadays these problems are minimised, because tape-heads are fed from a high-impedance amplifier so they draw less current as they wear, while tape-head gaps are better engineered so they do not change their sizes with time. But until the 1960s these problems were very troublesome, and tapes from this period often show overbiassing if the machine which recorded them was no longer brand-new.
The present-day tape operator has no way of curing these faults; S-blasting can sometimes be mitigated by selective low-frequency filtering, but that is all. This means we must both preserve the original and make an “archive copy,” because cures for these faults may be developed in future.
7.4 Magnetised tape heads
When the heads of a tape machine with A.C. bias become permanently magnetised, they then behave like heads with D.C. bias, leaving a great deal of background-noise. A similar problem can occur if a reel of tape is placed near a loudspeaker or a microphone. You will also find references in the technical press to losses in high-frequency response and increases in even-harmonic distortion, but I haven’t experienced them from this cause.
The result is low-frequency background noise. It is particularly apparent on a tape which has splices, or any creases or unevenness in its surface, because these cause variations in the steady magnetic field, which are picked up by the replay head as thumping noises. Dropouts, or incipient ones which are actually too small to be audible as such, can also cause noises. The effect can also occur long after the original recording has been made, if the tape happens to be run across a deck with magnetised heads or tape-guides. The effect is usually perceived as a series of low-pitched gurgles.
Of course, the solution is never to record or play the tape on a magnetised machine; however, it’s too late by the time the archivist hears the effect! It cannot be cured on a dubbed copy. The only way of minimising the noise is to rewind the original tape evenly, perhaps under more-than-normal tension, to flatten out any creases. Experience suggests that splices work better if they’re not remade. When the tape is played, it may be possible to fiddle with the back-tension or pressure-pads (if any) to ensure the tape is in intimate contact with the replay head at all times. Another aid is to choose a deck with a reputation for “low modulation noise”, a similar fault in which tape hiss goes up and down with the signal. This too is due to irregular tape motion, but is an effect which occurs during the recording process. Although portable “Nagra” machines are absolute pests to rig in a mains environment, you may well find it better to play tapes which have been across a magnetised head on a Nagra (which is beautifully engineered for low modulation-noise).
Otherwise, selective filtering is the only available palliative; this has a subjective element, of course, so cannot be recommended if restoring the original sound is the sole aim. Sections 4.19 and 4.20 described two possible ways of automating the selective filtering on mechanical recordings; but low-frequency noises on magnetic tapes are not strongly correlated with the rotation of the pancake, so building up a consistent “noise profile” hardly ever works. It can be said that (a) modern tape machines and tape are less liable to trouble, because of better magnetic materials; and (b) some kinds of noise reduction during the recording process (Dolby A, dbx, Telcom, and Dolby SR) can act as insurance to reduce the effect if a tape should become magnetised in the future.
Once again, though, it is the duty of an archivist to preserve the original and/or make an “archive copy” in anticipation of better cures.
7.5 Print-through
This is not strictly a recording phenomenon, but it may cause an archivist a great deal of distress. It happens when the magnetic pattern on one layer of tape “prints” onto the next layer on the reel. The result is “pre-echo” or “post-echo.”
I must confess that I haven’t experienced much trouble with it myself. Modern tapes have a B-H Curve which is shaped to resist print-through. But you should know that there are several factors which influence the effect, including the following:
- 1. Print-through increases with time in storage (roughly logarithmically), and with the absolute temperature.
- 2. Excessively high peak volumes can overcome the initial step in the B-H curve, and cause disproportionate print-through.
- 3. Physical vibration (e.g. dropping the reel) can increase print-through, as can strong magnetic fields (don’t store tapes near a lightning-conductor or a loudspeaker).
- 4. Print-through is inversely proportional to the thickness of the tape base, and its efficiency is raised when the wavelength of the sound is the same. For practical professional open-reel tapes, human vowel sounds are worst affected.
- 5. Rewinding the tape before use helps the print-through to self-demagnetise by a few decibels.
- 6. Storing the tape tail-out when oxide-in (and head-out when oxide-out) takes advantage of the curved shape of the magnetic lines of force to reduce the effect slightly, so that pre-echo is quieter than post-echo (which is more natural).
- 7. When the tape was recorded, some reciprocal noise reduction processes could have helped, not to mention suitable choice of tape. Unfortunately, tapes with the best inherent power-bandwidth product tend to have worse print-through.
The lessons for storing the tapes are obvious. My concern is “What can we do to minimise print-through on playback?”
For many years, the standard answer has been to power the erase-head of the tape reproducer at a very low level, because the print-through tends to be below the “knee” of the B-H curve and is easier to erase. However, this may also erase some of the wanted signal, especially at high frequencies. Since it can only be applied to the original (not a copy), I consider it important to transfer the tape twice, once before the treatment and once after, to be certain we do not lose anything. I am told the optimum usually occurs when the erasing current cuts the highest wanted frequency (about 15kHz on 38cm/sec tape) by about one decibel.
More recently, Michael Gerzon rediscovered some experiments done by the BBC Research Department in 1953, which showed a better cure was to run the tape past a weak erasing field applied through the back of the tape. This does not affect the high frequencies so much, since they are confined to the outer layers on the oxide side of the tape. But I have no experience of this process.
A number of workers have suggested various digital signal-processes involving delayed signals and cancellations. It seems to me these would never work properly, because of the hysteresis distortion in the printed signals. But here is an avenue for research. Since it would tackle background noises rather than the wanted signal, any subjective elements would not matter to the archivist.
7.6 Azimuth
Ideally, the gap in a tape head should be exactly at right-angles to the direction of tape travel. If this is not true, the sound at the top edge of the tape will be reproduced a fraction of a second differently from the bottom edge of the tape, and this will affect the reproduced high frequencies. In extreme cases, certain high-pitched notes may completely cancel; this cannot then be cured on a subsequent generation. Another effect is that on a stereo recording, there will be a timing error between the left and right tracks.
The angle of the gap is called the “azimuth angle”, which isn’t a very good term because that implies movement about a vertical axis, whereas we are (usually) talking about a horizontal axis; but that’s the name we’re stuck with. The azimuth angle should be exactly ninety degrees in all audio applications. (It’s sometimes different in video).
If you find a tape with incorrect azimuth, the cure is to deliberately misalign the playback head until its orientation coincides with that of the original recorder. In most cases the error is constant, and can be corrected by ear. It is an objective judgement rather than a subjective judgement, because there will be only one position which gives the maximum high-frequency response. Provided the rest of the machine is correctly aligned to a standard test tape (see section 7.7 below), the correct replay frequency response is assured.
It is perhaps worth noting some incidental points. If the tape was recorded and played back on the same machine, and if the machine had a combined record/replay head (serving both functions), or the replay head was adjusted empirically to match the recording-head, or worse still the recording-head was adjusted to match the mis-aligned replay head (many quality cassette machines work like this), then the engineer would not have heard the effect when he played back the tape. Therefore it is quite normal for tapes to exist with this fault, which no-one knew about until you played it!
But it isn’t good for your machine to be “groped” unnecessarily. You should not play with the mountings of the replay head just to see whether the azimuth is mismatched or not. Fortunately the solution is simple on most open-reel tape reproducers. As the tape plays, touch the top edge of the tape with a pencil and push it down. If this is done to the left of the playback head the tape will, in effect, rotate anticlockwise against the head. Repeat the process to the right of the head. If either process results in more treble being audible, then it’s time to get out your screwdriver and adjust the head-mounting. If the tape is stereo, or you are playing a full-track mono tape on a stereo machine, parallel the two channels (or switch the amplifier to mono) when doing this test. This will double the effect if it exists, and ensures the stereo phase-relationship is optimised as well as the frequency-response. You could also use a Lissajou’s display on an oscilloscope or digitisation software, which is even less invasive.
Cassette tapes are particularly vulnerable, and in the author’s opinion “azimuth” is the main defect of the format. The difficulties are exaggerated by (a) the low tape speed, making the azimuth angle more critical; (b) the common use of noise-reduction, which usually exaggerates high-frequency losses; (c) the pressure-pad being part of each separate cassette rather than of the machine; and (d) the capstan pressure-roller and the pulley downstream in the cassette itself creating significant errors. Unfortunately, it is often difficult to poke the tape as it plays.
Indeed, you usually have to remove the loading door to get access to anything. I recommend you keep one dedicated machine for reproducing cassettes if you can, with easy access to a replay head mounted on springs rather than screws, so the head can be rocked slightly by pressing it with a pencil as the tape plays. Then azimuth can be checked; but you should re-check it every time a new cassette is loaded, as individual cassettes may vary, even if they were all recorded on the same machine. (Nakamichi used to make a cassette machine with motor-driven azimuth-setting, and another with two capstans which dispensed with the pressure-pad).
At the British Library Sound Archive, we keep various machines (and tapes) deliberately for experimental purposes. We call them “sacrificial,” because (archivally) it doesn’t matter if they are wrecked in the process. If you don’t use a sacrificial machine, at the end of the session you must always set the head back to the correct azimuth. If it’s a combined record/replay head and you don’t reset it, all the subsequent tapes made on that machine will be faulty, and you won’t know it. I advise you to purchase engineering test tapes and test-cassettes to be quite sure (see section 7.7). They’re expensive, but the penalty if you don’t have one can be much greater. Reviews in hi-fi magazines show you can never trust even a new machine to be set correctly.
The Cedar “Azimuth Corrector” does not correct azimuth! What it does is reduce the time-errors from two tracks on a stereo tape. Therefore you are still obliged to use your pencil and screwdriver to get optimum reproduction of each track.
So far I have assumed the azimuth error is constant, but sometimes it will vary during a recording. It is worth knowing the reasons for this, so you may be able to invent an appropriate cure. One might be that the feed-spool of an open-reel tape recorder has not been placed squarely on the hub, so the pancake is going up and down as the tape leaves it, and the machine has insufficiently precise guides to hold the tape properly across the headblock. The solution is to re-create the fault on a similar machine, although once the tape has been rewound the original relationship between the tape and the spool is lost, and you may have to reset the reel at intervals.
A palliative (not a cure) is to replay only part of the tape track, for example to play a full-track tape with a half-track head or a half-track tape with a quarter-track head (section 7.8). Here the high-frequency response errors are halved at the cost of signal-to-noise ratio. It is a subjective judgement to balance the two disadvantages, and should only be used as a last resort and with suitable documentation to prove you’ve done your best.
The CEDAR “azimuth corrector” will reduce some of the timing side-effects if the azimuth slowly changes, but it may fail in the presence of loud background noises which differ between the two tracks. (The human ear can detect phase subtleties the machines will ignore). And neither process should be used for stereo tapes without careful thought, because they can be considered subjective processes. The CEDAR machine will make its best guess at averaging the time-differences; but spaced-mike stereo involves deliberate time-differences, which the machine may ruin in an attempt to make an “objective copy.” This seems particularly important on location events where the recordist has held two omnidirectional microphones at arms’ length. All the stereo information depends on which direction he’s facing, and if he turns to face something, the evidence that he has changed his orientation is destroyed. Whether this actually matters depends on the application! But in principle I recommend azimuth correctors only for mono, or for true “coincident-mike” stereo recordings.
Also neither process guarantees the full power-bandwidth product when a single track is split into two, because each half of the tape is still being reproduced with some treble loss. I have absolutely no practical experience of what I am about to say, but it seems to me that a logical way to proceed would be to divide each track into four (or eight) sub-tracks, and process them in pairs.
7.7 Frequency responses of tape recordings
This is a surprisingly complicated subject, which isn’t helped by the fact that most of the errors which can occur are subtle ones. But it is necessary for me to start by explaining that all tape reproducers need some sort of electronic circuitry to bend the frequency response, and the problem is that there are (or were) several philosophies.
The problem arises because most tape playback heads do not reproduce the strength of the magnetism on the tape. (The exception is the “Hall Effect” head, which is not used in audio as far as I know). Instead, audio playback heads have an output which is proportional to the rate of change in magnetism they pick up. Since low frequencies change more slowly, they are reproduced more weakly, while “direct current magnetism” (as recorded by a permanently magnetised recording head) results in no output at all until there is a variation, as we saw in section 7.4. Thus low frequencies must be emphasised electronically in the playback amplifier in order to restore the correct frequency balance. The amount of equalisation is large, and that implies a lot of amplification, which (in valve days) was expensive.
There were several philosophies for magnetic wire recording, to judge from the only book I know on the subject (Ref. 2). One was to cover the noise of DC-biassed wire by careful pre-emphasis taking account of the distribution of energy in speech and the subjective perception of distortion; and another was to design an amplifier which could be switched between recording and playback, so it had a compromise equalisation halfway between the ideal recording and replay curves. (There was never a “standard” for wire; the author’s experience is that a modern replay amplifier with the same equalisation as 9.5cm/sec tape nearly always sounds right, with only extreme treble requiring attention).
After the initial success of AC-biased tape, anarchic periods followed on both sides of the Atlantic. You will need sheer luck to equalise many of these very early tapes accurately. In the USA, it was thought that the new technology would replace scratchy 78rpm disc records for domestic listening. To make tape players simpler, equipment manufacturers considered the inherent bass loss should be compensated during recording, and some pre-recorded tapes were marketed on these lines by Webcor.
7.8 “Standard” characteristics on open-reel tapes
- das Ampex 200A von 1947

However, in American professional circles things were different, because of the dominance of Ampex tape recorders. In 1949, the Radio Manufacturers Association of America proposed “Measuring Procedures for Magnetic Recording” (both 19cm/sec tape and 2ft/sec wire) in the Audio Engineering magazine, which did not mention any equalisation characteristics at all (the recording amplifier being flat within 1dB, thereby requiring thirty or forty decibels of equalisation on playback). (Ref. 3).
Constructional articles in the same magazine provided no equalisers for recording-characteristics (only head-losses) as late as June 1952; but by October 1953 the magazine was reviewing a tape-recorder “well suited to the advanced hobbyist who will be satisfied only with the professional type of equalisation.” By 1954 Ampex had a standard alignment tape which was available to outside engineers, and in August 1954 the magazine was drawing attention to the two incompatible philosophies on pre-recorded tapes which I mentioned earlier. This was much more severe than the equivalent problem on discs, but it began to be sorted out for the domestic market in 1955.
So, instead of keeping the playback electronics cheap, it seems that from 1955 all American tape recorder manufacturers accepted the principle of “replay equalisation,” which is still current today. But to keep things as simple as possible they made it the same at all tape speeds. The standard adopted by the National Association of Broadcasters (the “NAB” standard) was the “50 microsecond” characteristic. Don’t worry if you can’t understand this; please accept that “50 microseconds” is a quantitative way to define a section of the playback electronics.
However, European manufacturers followed a different path. Broadcasters optimised the circuitry to give the best results for each tape speed. The standards they adopted, known as the CCIR Standards, were issued in the form of recommendations in 1952. The recommendations for 38 and 76 centimetres per second (15 and 30 inches per second) were 35 microseconds, but the case for 19 centimetres per second awaited further discussions. The 38cm/sec recommendation was finally fixed at 35 microseconds in 1953, and the 19cm/sec version at 100 microseconds.
These standards were extended to the magnetic tracks on film and later video. 35 microseconds was used for 35mm film and 15 ips Quadruplex European videotape, and 100 microseconds for 16mm film and 7.5 ips Quadruplex European videotape. The International Standards Organisation proposed these curves for films for the international exchange of television programmes in June 1956. Again, I regret I do not know the dates these standards were actually finalised, but it was certainly done by 1960, and you should use these curves in the absence on any evidence to the contrary.
These standards also became adopted for pre-recorded commercial audio tapes made in Europe. (Ref. 4). A commercial pre-recorded test tape to the 100 microsecond characteristic was marketed by EMI in 1956 (catalogue number TBT.1).
It was logical for someone to propose a 3.75 ips (9.5cm/sec) standard as early as 1955 when such tape speeds became common on domestic tape recorders, and this standard would also have applied to 8mm magnetic film soundtracks; but nothing was decided in “CCIR days.” Discussions proceeded in anticipation of a new standard (duly published by the IEC in 1966), but in the meantime it was anarchy. In practice, curves varying from 100 to 200 microseconds were common.
Now to the crucial point about European and American standards.
If you play a professional 15ips CCIR 35 microsecond tape on a NAB 50 microsecond machine, the result is subjectively quite acceptable, but the extreme high frequencies are reproduced up to three decibels stronger. It is not enough to “ring alarm bells” in the casual listener unfamiliar with the original, so clear documentation is called for. But at 7.5 inches per second the difference is much more marked. A 100 microsecond tape played on a NAB machine will sound very “dull”, quite different from the original engineer’s intentions. The treble is 6dB lower, and the effect spreads down to the mid-frequencies as well. Reciprocal effects occur when NAB tapes are played on CCIR machines.
For completeness, I should also say there is a difference between the two standards at extreme low frequencies. At 38cm/s and 19cm/s, NAB records more strongly below 50Hz (equivalent to 3180 microseconds), so that less equalisation (and therefore amplification) is needed on playback. But I shall ignore this from now on. It might be less significant subjectively, but you should remember side-effects can be considerable if a tape noise reduction system is used.
For British archivists, the problem is made more difficult by the different histories of the record-companies operating in London. The EMI group and the BBC followed the European tradition, while the Decca group (which imported its first machines from the USA) and American-based companies like RCA and CBS used the NAB standard. During the growth in London recording-studios in the ’sixties, it was necessary for British engineers to be able to cope with both standards.
In 1967 the 19cm/sec European standard was changed from 100 microseconds to 70 microseconds. This was midway between the two previous standards, so errors were reduced. It also meant that the 19cm/sec changeover frequency was exactly half the 38cm/sec standard, and if tapes were copied at high speed (so that, say, a duplicate was made of a 19cm/sec tape by playing and recording at 38cm/sec), the frequency response along the connecting leads would still be “flat” and measurable on a meter. To take matters further, the 76cm/sec standard was changed to 17.5 microseconds which also gave a flat response along the connecting-leads; the Americans called this “the AES curve.” Finally, the 9.5 cm/sec standard was fixed at 90 microseconds and the 4.75 cm/sec at 120 microseconds. This set of standards is known as the IEC Standard. The equivalent equalisations for the magnetic soundtracks on other media running at similar speeds, such as open-reel videotape, 16mm film, 8mm film, and ferric audiocassettes, changed shortly after.
So we now not only have incompatibilities between European and American tapes, but between European ones as well. A pre-1967 tape recorded at 19 cm/sec (or, more pragmatically, such tapes recorded by amateurs on machinery purchased before 1967) will sound “dull” on a present-day machine, affecting the “presence” of the recording. It’s only a matter of three decibels difference, but the archivist copying such tapes must make every effort to get the equalisation right.
As the differences are subtle, it can be quite a problem deciding which curve to use in the absence of documentation or frequency tones. Most professional machines could be ordered to any standard, and there have been a few with both European and American selectable by means of a changeover switch (so knowing the make of machine isn’t much help). But mass-produced tape recorders for the domestic market were usually made to one specific philosophy. If you happen to know the make of machine, you can eliminate some ambiguities by the lists in Box 7.8, which are compiled from the British HiFi Yearbooks for 1957 to 1981. This shows how makers marketed their machines in Britain; it would not necessarily be correct for the same machines purchased overseas. Also, if you cannot find a name here, it usually means the company did not have a consistent policy from one model to the next.
BOX 7.8.
TAPE RECORDER MANUFACTURERS AND EQUALISATION
MANUFACTURERS SPECIALISING IN NAB MACHINES:
Akai; Baird Varsity; Grundig (not models TK14 and TK18 in 1963); Nivico; Q-Cord; Revox (early transistor machines); Sanyo; Siemens Norge; Sony (except for six models in 1967: TC250, TC260, TC350, TC357, TC530 and TC600); Symphony Pre-Sleep Learning Recorder; Teac; Telefunken before 1970; Uher. (The BBC had hundreds of portable Uher recorders, but they were left as NAB machines - not converted to IEC - as this was considered more satisfactory for speech with the mikes then in use. I would therefore play such tapes with NAB equalisation unless the recording is not speech, or is known to have been done with an unusual microphone).
MANUFACTURERS SPECIALISING IN CCIR or IEC MACHINES (depending on date):
Abbey; AD Auriema; Alba; Amcron; Bang & Olufsen; Beam-Echo Avantic; Brenell; British Radio Corporation (making machines with the trade-names HMV and Marconiphone); Butoba; Cinecorder; Clarke and Smith; Contronics; Crown; Dansette; Dynatron; Elizabethan; Eltra; Ferguson; Ferranti; Ferrograph; Fidelity; Finex; Fonadek; Gilkes Pakasound; K.G.M; Kolster Brandes; Magnavox; Marconiphone; Philips; Pioneer; Portadyne; Pye; Reps; Revox (valve machines); Robuk; Sharp; Silvertone; Solartron; Sound Riviera; Sonomag Spectone; Stereosound Carnival; Symphony; Telefunken (1970 onwards); Truvox; Ultra; Van der Molen; Volmar; Vortexion; Wyndsor.
MANUFACTURERS WHO MADE MACHINES CAPABLE OF BOTH (switchable):
Bias Electronics; Philips PRO35; Revox (later machines); Scopetronics; Sound Sales; Studer (most models); Telefunken Model 85 de Luxe.
MANUFACTURERS WHO MADE MACHINES CAPABLE OF EITHER (by changing PCBs):
Most professional machines, including Ampex, EMI, and Studer; also Chilton; Ferrograph (model 422); Tandberg (Model TD10); Tape Recorder Developments.
MANUFACTURERS WHO MADE HYBRID MACHINES:
C.W.S Ltd. Defiant T12: “Compromise replay characteristics.” Reflectograph Model S: “CCIR at 7.5ips, NAB at 3.75ips.” Stuzzi: “Close to CCIR.”
So far we have been talking about open-reel tapes. Before we move onto cassettes, I should mention that in the mid-1960s there were various attempts to modify the standards to minimise tape noise in professional circles. Ampex, in America, proposed a “Master Recording Equalisation” curve (known as the AME), and Nagra in Europe did something similar with their “Nagra Master” curve.
Both were for 38cm/sec only. They may be considered additional to the normal NAB and CCIR curves, so they may be compensated by circuitry external to a reproducing tape machine. They both emphasised frequencies in the range from 1kHz to 8kHz by about 6dB, leaving lower frequencies (which corresponded with louder subject matter) and higher frequencies (where HF distortion set in) unemphasised.
7.9 Standards on tape cassettes

Compact cassettes also suffered from non-standardisation in the very early days (1963), although from about 1970 onwards Philips (the inventors) enforced standards, and this has largely reduced the unknown element. These standards apply to both sides of the Atlantic. Differences are confined to the tape formulation; I shall now explain this.
After the various steel tapes and wires of pre-war years, there were four formulations of magnetic coatings on plastic bases. The first was (and still is) acicular gamma ferric oxide. This has been around since the mid-1940s, but has been the subject of several improvements. One was the application of a permanent magnetic field at the time of manufacture to align the magnetic particles before the solvents evaporated (dating from the spring of 1953 in the USA, starting with “Scotch 120”); this gained six or eight decibels of sensitivity, but did not affect the basic signal-to-noise ratio, while the modulation-noise was actually worse to begin with.
Next came the use of smaller particles to reduce tape hiss and improve treble (the first manifestation being Scotch 202 in 1965). Smaller particles always mean a more-polished surface, so lower modulation-noise; but the penalty was that fine-grained tape was more susceptible to print-through. (Dolby A noise reduction helped with this). Another modification to ferric tape was to “cobalt-dope” the particles, where the ferric oxide particles take on a coating of cobalt, which has the effect of greatly improving the retentivity. This happened in about 1969. All these tapes are known as “ferric” tapes for short, and when used in audiocassettes they are called “Type I.”
Next came “chromium dioxide”, first introduced by the DuPont company in 1964 for instrumentation recording. Chromium dioxide is highly toxic, which is why there are only two companies in the world making the basic material today. It has the advantage of shorter magnetic particles, so high frequencies can be accommodated in less tape. So far as the sound operator is concerned, it was first used for video tapes. But in the early days the non-linearity of “chrome” meant there was permanently a few percent of harmonic distortion whatever the signal volume; so it tended to sound “rough”, even though the video recorded better. This fault seems to be cured now. “Chrome” is now used in audiocassettes, and they have the classification “Type II”; but chrome has never been used for open-reel audiotape to my knowledge.
“Ferrichrome” cassettes (Type III) were on the market for a couple of years to get the advantages of ferric (low distortion) and chrome (short wavelengths) in one formulation. They comprised a basic ferric formulation with a thin layer of “chrome” on top. They are now obsolete.
“Metal” or “Metal powder” tape, known as “Type IV” when in audiocassettes, was introduced by 3M in 1979, followed immediately by other manufacturers. Its coating comprised particles of pure iron in a suspension. This had the short-wavelength property of chrome, but could hold four or five times as much magnetic strength, with a consequent improvement in signal-to-noise ratio. But to take advantage of this, the recording electronics and heads had to be able to deliver four or five times as much bias and audio without overloading, and even today this isn’t always achieved. But metal tapes are ideal for compact video recording (such as the Hi8 format), and are essential for R-DAT digital cassettes. “Evaporated metal” is even more effective, since it comprises pure iron particles or sheet cobalt undiluted by binder; this approximately doubles the magnetic efficiency again, but the manufacturing costs are (as you can imagine) very high. At this point in time, the archival stability of metal-powder tape is doubtful, while evaporated metal tape means a rapid conservation copy must be made, since it often becomes unplayable within a decade.
Now for the point I want to make about playing the different formulations. In audiocassettes, Type I tape is reproduced to a different frequency characteristic from the other three types, and if your machine does not automatically recognise what tape it is, you will have to switch it manually to get the right result. Ferric cassettes (Type I) are meant to be reproduced at 120 microseconds, while “chrome”, “ferrichrome” and “metal” formulations (Types II, III and IV) are to be reproduced at 70 microseconds.
This can cause difficulties for pre-recorded cassettes recorded on “chrome” tape (for quality), but intended to be compatible with older machines with only “ferric” capability. So the following system has been adopted.
A second “feeler hole” (next to the “erase tab”) is supplied on cassette shells for 70 microsecond tapes, while pre-recorded “chrome” tapes will usually be recorded to the 120 microsecond curve and packed in “ferric” shells. Many newer machines can detect the extra hole and switch the equalisation automatically depending on how the manufacturer intended reproduction to be equalised. (The recording-equalisation problem doesn’t arise, of course. All pre-recorded tapes should have the erase tab removed, so the consumer cannot accidentally record over the material, compounding the error by using ferric equalisation on a chrome tape).
But if the playback machine has manual switching, the operator must be guided by the presence or absence of the feeler-hole. If you have such a switch, I suggest you play with it while you listen to its effect. It will subtly affect the balance between the bass and treble parts of the frequency range, without actually cutting off any part of the spectrum. It’s another example of how playing a tape incorrectly has a subtle effect; and for that very reason I urge you to become familiar with it, so you may catch the fault where others might fail.
To complete the story of “feeler holes,” a cassette containing metal tape (Type IV) should have a third feeler-hole (at the centre of the cassette-shell edge). This shouldn’t affect the playback electronics; it is provided simply to increase the bias and audio power when recording.
7.10 Operational principles
I would recommend that an archive should make a conscious decision to standardise on either NAB or IEC for its internal open-reel recording work, thereby minimising swaps and mistakes on playback. Whether your archive should keep at least one reproducing machine for playing “the other standard” depends on your workload; but if you do, you will need a second set of calibration tapes. If you are undecided, I would advocate that your collection of machines should be IEC, because it is simple to play NAB tapes through an external passive equaliser patched between the IEC machine and a mixing console It isn’t possible to go the other way without (theoretically) an infinite amount of amplification for the bass lift at 3180 microseconds. And for older “CCIR” tapes, you can use a passive equaliser in the connecting-lead to pull up the high frequencies by 3dB.
For audiocassettes I also recommend you get a 120 microsecond test cassette, even if you don’t plan to archive on the format.
Machines set up to such test tapes can be used to make “objective copies” without further ado; but if you’re lucky and the tape has calibration tones, you should override the alignment of the machine and re-equalise to get the tones correct. (Remember, the tones document the performance of the tape as well as the machine).
It is also possible to misalign replay machines to play alien standards by means of the apprpriate conversion graphs. Alternatively, the conversion curve could be set up on a third-octave graphic equaliser, but I have to say it is quite difficult to set the controls accurately enough, and (for theorists) the phase-response is not correctly recovered.
The position for early magnetic film soundtracks is rather different, because there was little interchange between studios until the time came to screen the results, which was not until the introduction of stereo. A 1953 paper on Hollywood stereo film soundtracks showed that at least three equalisation characteristics were in use (Ref. 5). Meanwhile, the EMI stereo 35mm sepmag equipment for the Telekinema at the 1951 Festival of Britain had 40 microsecond equalisation (Ref. 6).
Another difficulty faced by the archivist concerns video tape soundtracks. If your archive is doing its job properly, it may be necessary to separate the video and the audio restoration processes to get the correct audio power-bandwidth product. Certainly, specialist audio machines usually have better wow-and-flutter performances, and the audio can be handled more sympathetically away from the cost and noise of a broadcast videotape machine and the hassles of restoring the video.
If the video is being moved to a format with a better video power-bandwidth product, you should do likewise with the audio. Digital video formats which may be used for making preservation copies generally have several audio tracks, and you might commandeer one for reversing signal-compression inadvertently imposed when the video was shot (see chapter 10), thereby providing “archive” and “service” copies on the same tape. This implies that you should know about suitable synchronisation systems as well; but here I advise a manual on video synchronisation methods.
There are so many video tape formats that sometimes archivists have no alternative but to play a videotape on an open-reel audio machine in order to hear the soundtrack (and often to establish what the dickens it is!). This may happen when the tape is in a videocassette, which must therefore be unloaded. The audio will usually be along the top edge of the tape (as you look at the back of the tape moving from left to right).
The control-track (which may be essential for setting the speed, or maintaining synchronism in a post-production session) is usually along the bottom edge. With professional video machines (such as Quadruplex and C-Format), the equalisation curve for the linear analogue audio was usually supplied to suit the philosophy of the country concerned, i.e. IEC in Europe, NAB in America and Japan. But with semi-pro and domestic machines the problem is not so clear-cut. The writer’s experience is that such machines used standardised audio printed-circuit boards for the whole world, so for formats which originated in Japan or the USA, the circuitry is NAB. It is quicker to list the exceptions - formats which originated in Europe: Philips N1500, N1700, Video 2000, and Grundig SVC. Of course, if you have the right video alignment tape there’s no problem, but this is rare.
If you are lucky enough to have spare time on the correct video tape machine, an audio test tape of the appropriate width, speed, and characteristic could theoretically be run through it to check its audio electronics. But I do not recommend this because it is such a hazardous process; the video machine may not run at a submultiple of 38 centimetres per second, and some capstan servos will do strange things if there’s no control-track. So the conscientious archivist will make a duplicate of his original audio test tape upon a suitable tape-deck (carefully adjusting the level of each frequency until it matches the level of the original), modify the recording-speed appropriately, and add a suitable control-track along the appropriate edge of the tape, before (possibly) packing it into a suitable cassette housing.
Irrespective of the format, all tapes will have decreased output at high frequencies if the tape has been subjected to appreciable wear. A 1952 paper (Ref. 7) found no appreciable losses after 125 replays, but the level of 15kHz sinewave was -8dB with respect to 1kHz after 1800 replays (probably at 15ips, although this was not stated). Meanwhile, at the Joint Technical Symposium in Paris on 21st January 2000, the Bibliothèque National Française exhibited a statistical survey of videotapes in their possession, showing the remanant induction of their luminance signal (with the highest frequencies) had declined. Tapes made in 1974 had only 41% of their original remanant induction, and this after storage in archival conditions without even being played for twenty-five years.
The problem of equalisation is not yet over, because it will be subtly affected if we use a head of the wrong width. (I shall consider track widths in the next section). This is because low-frequency magnetic patterns “leak” across space, and will add to what is picked up by a tape-head which is any narrower than the track. This is called the “fringing effect”, and will vary with the tape-speed, and whether the head is against blank tape or air on one side. Normally, test tapes are full width, so you cannot necessarily prove the machine is correctly aligned when you play them with a narrower head.
Quite apart from this, the wavelength of extremely low frequencies can easily exceed the external dimensions of the replay head, which does not intercept all the magnetism, while slightly higher frequencies will cause “bass woodles” (ripples in the replayed frequency-response) at harmonic intervals. This is a playback phenomenon specific to the machine you are using.
Both these effects can be measured by recording low-frequency test-tones onto a machine with the same track-dimensions, and playing this tape on the intended replay machine. (It is comparatively rare for bias and equalisation to affect the recording of low frequencies). So far, no-one has developed a circuit for neutralising “fringing effects” and “woodles”; but since they are specific to your reproducing machine, you should carefully explore them and neutralise them with a parametric equaliser if you are making an archive or an objective copy.
Besides the recording and reproducing equalisation of the actual tape, we have to ask ourselves whether we should attempt to undo the characteristics of the microphone in order to restore the original sound. I have already given my views on this when talking about discs; please see section 6.5.
This seems to be the place to remind readers of a standard “Polarity Calibration Tape” for checking absolute phase (see section 2.10). (Ref. 8). Unfortunately, I know no equivalent for cassettes, video, or films.
7.11 “Mono” and “half-track” tapes
Originally quarter-inch audio tapes carried one channel of sound occupying the whole width of the tape, and therefore the tape ran in one direction, from “head” to “tail”. (This is the only system which circumvents the problem of “bass woodles”, which I mentioned near the end of the previous section).
A similar system is still in use for mono today, when a recording might occupy both tracks of a stereo tape; but this isn’t quite the same, because a full-track mono head playing a full-track mono recording will have about 1.6dB better signal-to-noise ratio than a paralleled stereo head playing such a tape. And the signal-to-noise ratio is 1.6dB worse when you use a full-track mono head playing a double-mono recording made on a stereo machine. 1.6 decibels of signal-to-noise doesn’t seem very significant, but the tape actually sounds much better than you’d think when the heads and tracks are matched correctly; I suspect modulation-noise may come into it as well.
This shows how careful documentation can improve the power-bandwidth product, even though it may be difficult to hear the difference. Another trick is to use a special head to play the “guard-band” between the two stereo tracks and see if there’s anything there, or use a magnetic viewer and see the dimensions of the guard-band.
In about 1948 it was found that, as an economy measure for domestic use, two tracks could be recorded each occupying just under half the width of the tape. This has become known as “half-track” recording (apparently short for “Slightly under half tape-width track recording”!) The recording would start at the “head”. This is a word with two meanings when talking about magnetic tape; here it indicates the beginning of the reel. It was usually along the top half of the tape when laced on a conventional “oxide-in” recorder. (Ref. 9). (The exceptions were Grundig 500L and 700L machines of the early 1950s, and the early Truvox Mk. IIIs, which used the bottom half of the tape). When the machine reached the “tail,” the user would “turn the tape over” (by swapping the feed spool and the take-up spool). Now the machine would record along the other edge of the tape, adding another track. This doubled the time which could be accommodated on a particular reel, and could save having to rewind it.
The trouble was that amateur users proved to be almost incapable of documenting things properly. Tapes may be found with the “head” and “tail” reversed, or the second track might be left blank altogether. This latter is a potential problem for the quality-conscious archivist, because unless he takes the trouble to listen to both tracks, he may not know whether it is full-track or half-track. If a half-track recording is played on a machine with a full-track head, the signal will be about 4.5dB lower while the hiss is the same, so the signal-to-noise ratio will be about 4.5dB worse. Conversely, if a full-track recording is played on a half-track head, the signal will be the same as with a half-track recording, but the hiss will be about 4.5dB higher than it should be, and again the signal-to-noise ratio will be about 4.5dB worse. It’s not a major degradation, so the operator may not realise he is degrading the signal. So, again, research is essential in the absence of documentation.
When stereo recording began in the early ’fifties, the tape had to be recorded with two tracks, both starting at the head. If the documentation isn’t clear, we must investigate whether the tape is stereo or not, which isn’t always as easy as it sounds. Both meters moving together might simply mean it is a full-track mono tape, and record companies sometimes fabricated “fake stereo” versions of original mono master-tapes. Careful listening, or a “sum-and-difference” meter, or an X-Y oscilloscope, may be needed to resolve the difficulty.
In the earliest days of true stereo there was no experience of the effects of crosstalk or timing-errors between the two tracks. We now know that crosstalk figures less than -30dB do not appreciably affect the stereo, but the tracks must be synchronised within a few microseconds. Some early stereo machines reversed these priorities. You are not very likely to come across such tapes, but you should know the principles.
The Bell Labs made a freak machine with two separate tapes fed past two sets of heads and through the same capstan (Ref. 10). A roughly equivalent situation arises in films, where different components of the final soundtrack (such as dialogue, music, and effects) may be recorded on several separate magnetic tracks. These would be pulled through several linked machines by toothed sprockets. The long-playing disc of the first publicly-shown stereo optical film (“Fantasia”) was made this way, and the microsecond errors are very clear when you switch the LP to mono; but I am not aware this method was ever used for magnetic stereo.
Next, early stereo tape-recording engineers used “staggered” heads - two mono half-track heads spaced a fixed distance apart on the same machine. To reproduce such tapes today, the archivist must use two separate heads exactly the right distance apart - within a thousandth of an inch - which requires experiments with one head mounted on a precision movable jig. Alternatively, you could use a conventional stereo tape reproducer and a digital audio editor to alter the synchronisation.
By about the year 1955 stereo tapes were made with “stacked” heads, in which the two channels were recorded by heads placed one above the other in a “stacked headblock.” This eliminated timing errors, albeit at the expense of a little cross-talk, and gave mono compatibility in the sense that when the stereo tape was played on a full-track mono machine, acceptable mono sound usually resulted.
7.12 “Twin-track” tapes
But then came another complication. In the early ‘sixties “twin-track” tape recorders became available, in which two tracks could be recorded independently, both starting at the “head”. For example, pop music studios could record the instrumental “backing” on one track, and later add the “vocals” on the other, to circumvent problems caused by vocal microphones picking up guitar amplifiers. The complications fork into two at this point.
The earliest such recorders used the playback head to feed the musicians’ headphones, and the record head to make the recording. Thus the vocal and the backing would be in different places along the tape. As these tracks didn’t need microsecond-accurate synchronisation, the tape could be moved to another machine (with similarly spaced heads), and the two tracks might be mixed in the disc-mastering room for the published version, thereby cutting generation losses.
More usually, the first track’s record-head was operated in reverse as a playback head (‘sync head’) of reduced efficiency for the musicians’ headphones. Generally this meant inferior high-frequency response and signal-to-noise ratio, with the added complication that sounds from the adjacent stacked recording head would cross the guard-band so the musicians might hear themselves more loudly than they desired. Nevertheless, the resulting two-track tape was in perfect synchronism for a stacked head. The archivist may come across examples of this type of tape, which may sound quite normal when played upon a full-track mono machine, but which actually imply subjective “mixes” of the two tracks.
Tapes like this are often used in the making of television programmes. Because crosstalk is much more critical with unrelated tracks, “two-track” heads are constructed differently from “stereo” heads, with a wider guard-band between the tracks. A two-track tape will play quite happily on a stereo recorder and vice-versa, but a slight increase in hiss (about one decibel) will result. It is usually impossible to tell the difference by ear. If the track width (or the guard-band width) has been documented somewhere, it is possible to choose a suitable replay machine; but otherwise exploration with a magnetic viewer will again be necessary.
As a further complication, television engineers found they could record “timecode” between the two tracks on a two-track recorder (which is the one with the wider guard-band). With suitable interfaces, the tape could then be synchronised with video equipment. When played on a mono or stereo machine with a narrower guard-band (and therefore wider audio heads), this extra track can break through as a continuous chirping or warbling sound.
This is not a monograph about television techniques, but you may also like to know there have been two “standards” for such a timecode - the “Maglink” one (which is analogue) and the SMPTE/EBU one (which is digital). Each can exist in various sub-standards depending on the picture frame-rate; I won’t go into this further.
Another twist may be found on American commercial master-tapes of the early 1960s, when background hiss was easily the most conspicuous defect of magnetic tape. The “Dynatrack” system (introduced by 3M) recorded the same sound on two tracks, one to normal NAB characteristics, and the other having an extra treble pre-emphasis shelf amounting to 15dBs with -3dB points at about 900Hz and 5kHz. The latter overloaded horribly at high signal volumes; but upon playback, an electronic switch chose the former. The switch had an “attack time” of 200 microseconds, and when the signal level on the former fell below the 1% distortion level, the circuit switched back in 10 milliseconds. So this is a possible explanation if you come across a tape with a normal and a toppy version of the same material on different tracks.
7.13 “Quarter-track” tapes
To go back to the late ’fifties, the track problem on quarter-inch tape became even more complicated with the introduction of “quarter-track” recording. This is different from “four-track” recording, but the terms are sometimes confused. “Quarter-track” is short for “Slightly under quarter tape-width track”, which means that the tape can theoretically accommodate four tracks which may be recorded independently. “Four-track” implies that the recorder can record and replay up to four tracks at once. The “four-track” machine will therefore have four sets of record and playback electronics. A “quarter-track” recorder will have only one set if it is mono, or two if it is stereo.
You can see why amateurs tended to give up with their documentation. To make things worse, there were two different conventions about numbering the tracks on different sides of the Atlantic. European machines were labelled so that the tracks were numbered in their physical order down the tape. A mono machine would start with Track 1 from the “head”. At the “tail”, the consumer would turn the tape over, and switch a switch to change to another head three-quarters down the head-stack, which (with the tape reversed) became the second track down the tape. Back at the “head” again he would turn the tape over and leave the switch in the same position, recording on Track 3. At the “tail”, he would then reverse the tape once more, and reset the switch to its original position, recording on track 4. For a mono recorder, the switch would therefore the labelled “1 & 4” and “2 & 3”.
At first, some American manufacturers numbered the tracks differently. What to a European would be “Track 4” would be “Track 2” to an American, and vice versa. If you’ve followed me so far, you will see that the advantage is that the switch only has to be switched once when recording or playing a reel; but the disadvantage is that the tracks are not numbered in their geometrical order. So the track switch would be numbered “1 & 2” and “3 & 4”. In April 1965 the NAB introduced a standard which matched the European way of doing things; but this accounts for the difficulty Europeans have in finding their way round American quarter-track tapes, even when they are perfectly documented.
The track-numbering for quarter-track stereo is similarly complex, made even worse because it was possible to have mono and stereo recordings on the same piece of tape.
Finally, we have the true “four-track” recorders dating from the mid-’seventies, which tend to be used by home recording studios for four independent lines of music, and keen hi-fi buffs for quadraphonic recording. There is little I can say about these except to alert you to their existence, and to advise you there will be complications in reproducing any of them. Fortunately, the archivist doesn’t come across them very often; and when he does, it isn’t his job to reduce the four tracks to two or one.

To cope with all these track layouts, I can only recommend that your archive acquires a true four-track quarter-inch machine which will play all four tracks at once. Using this and carefully selecting the tracks on a sound-mixer, it is possible to distinguish between full-track mono, half-track mono in one direction, half-track mono in both directions, half-track stereo, quarter-track mono in either or both directions, quarter-track stereo in either or both directions, and four-track.
It still won’t unambiguously separate stereo and two-track track-dimensions, but such a machine will greatly reduce the possibilities. It will be especially valuable for finding one item on an ill-documented tape, especially if it can also play tapes backwards without having to turn the tape over. The British Library Sound Archive owns a Studer C274 which offers all these features.
7.14 Practical reproduction issues
Whatever tapes you come across, there might be advantages in having access to a machine which splits a mono track into two (or more). If the tape is damaged or subject to dropouts or head-clogging, relief can sometimes be had from the first stages of the “Packburn Noise Supressor” and “Mousetrap” (see section 0). Besides being able to choose the quieter of two groove walls, they can be switched to select the louder of two channels. When the circumstances are favourable, it is therefore possible to mitigate such tape faults by playing a mono track with two half-width stacked heads. Although this may result in short sections of tape having poorer signal-to-noise ratio for the reasons mentioned above, we are more likely to achieve restoration of the original sound. Equivalent digital processes are easy to conceive.
I must also remind you that you may get errors of equalisation if you are forced to play a tape with the wrong head, as well as signal-to-noise ratio. We saw this at the end of section 7.10.
7.15 “Hi-fi” Tracks on domestic video.
Up till now, this chapter has concentrated on applications where the sound is not “modulated” in any way. That is to say, variations in sound-pressure are recorded directly as variations in magnetic strength. Digital pulse-code modulation is another way of recording sound, which I regard as being outside the terms of reference of this manual; but there is a third way, which I shall now consider.
The “hi-fi” tracks of videocassettes are “frequency modulated,” like F.M. Radio. Instead of the sounds being recorded directly as variations of magnetic strength, they are recorded as variations in the frequency of ultrasonic carriers. Thus, increasing sound-pressures might be represented as increases in the frequency of the carrier-wave. The advantage is that, after demodulation, the sound is largely immune to interference - background-noise - so long as the carrier remains above a certain strength. The process was first used by Sony for their Betamax domestic video-recorders. In 1986 JVC adopted the idea for their rival high-end domestic VHS machines, and this is where the archivist will usually encounter it today.
Conventional F.M theory dictates that the wanted carrier should always be at least twice the strength of other sources of noise in the same frequency-range, whereas “baseband” magnetic recording requires the wanted signal to be hundreds or even thousands of times as much. (This assumes that speed errors are not significant; they will add noise otherwise).
All these machines seem to achieve “something for nothing.” They modulate stereo sound onto two different FM carriers, and record it “under” the video signal (this is done by recording the audio FM carriers first, using an additional head on the video head-drum; then the pictures are superimposed at a higher frequency by a second head whose information does not penetrate so deeply into the tape). In practice, the sound carriers are chosen so they do not impinge upon the carriers for the luminance - which is also frequency-modulated - and the chrominance - which is amplitude modulated - and the tape behaves like the broadcast spectrum with four different broadcasts.
But there is no such thing as a “free lunch,” and compromises are involved. The first is that, in practice, you cannot get an adequate signal-to-noise ratio without reciprocal noise-reduction, which is the subject of chapter 8 (but such standards are fixed by the Betamax and VHS specifications). The second is that television sound is generally confined to the frequency-range 40Hz - 14kHz. Substantial amounts of energy outside this range will defeat the noise reduction system, even though the F.M system can easily cope with such frequencies. The means by which television pictures are displayed means the dynamic range of the sound must be compressed (see chapters 12 and 14), and this also helps to drown the side-effects. Finally, you can’t edit or change the sound, independently from the pictures.
Yet, compared with a “linear” soundtrack, the subjective improvement is very great. We have the anomalous situation that a cheap VHS videocassette with a “hi-fi” track can have better sound-quality than a professional analogue one-inch open-reel videotape recorder costing a thousand times as much. This is where the VHS medium comes into its own; on “live” broadcasts, its sound quality might in theory exceed first-generation video tapes in the broadcaster’s own vaults.
Now the bad news. Interference always occurs when the video head-drum’s alignment is imperfect. If the playback video-head is not running perfectly along the video track, the carrier-to-noise ratio will decrease, and with it the demodulated audio quality. A video dropout may be compensated electronically, but the audio will inevitably suffer a click; and frying noises can appear if the reproduced FM track is not at full level for part of the picture field, or if the head strays off-track. (Fortunately, this is nearly always accompanied by visible picture degradation, so it doesn’t happen very often. Professional VHS machines have a tracking meter to indicate the strength of the video signal; the audio is almost always correlated with this. Adjustment of the tracking control should solve the latter difficulty, perhaps in conjunction with other geometrical tweaks familiar to video operators, such as a “skew” control or equivalent).
More troublesome is that domestic formats have two video heads, one for each field of the television waveform. If the signals do not join up seamlessly, the audio carrier is interrupted fifty times per second (sixty times in NTSC countries). The symptom is a “spiky buzz.” The noise reduction circuitry is specifically designed to reduce this, although some signals can upset it. Ultrasonic and infrasonic ones are the main problems, particularly on “live shoots” where the signal from the mikes was not filtered. But other signals also occasionally catch it out. An unaccompanied soprano singing quietly in the middle of an opera is the worst case I have met, because the vibrato, the lack of a bass-line, and the relatively low volume made the buzz go up and down very audibly. The same symptoms can occur if either the recording-head or the reproducing-head is slightly worn; as the track is some microns below the surface of the tape, even a small amount of wear or misalignment can capsize the operation.
Cures may require a skilled video engineer to recreate the original “fault”, or a brand-new machine without significant wear. Less skilled operators can only tweak the tracking and adjust by ear. It is worth remarking that the right-hand stereo channel has the higher carrier-frequency, which is less likely to be replayed cleanly; so (all things being equal) faults may show up more on the right-hand track.
REFERENCES
- 1: British patent specification 7292/1903.
- 2: S. J. Begun, “Magnetic Recording,” Thermionic Products Ltd., 1949. This is a British reprint of an American book dated June 1948, but I have not been able to find the American publisher.
- 3: Dr. S. J. Begun, L. C. Holmes and H. E. Roys: “Measuring Procedures for Magnetic Recording” (proposed standard), RMA Subcomittee on Magnetic Recorders R7.4, published in Audio Engineering Vol. 33 No. 4 (April 1949) pages 19 and 41-45.
- 4: “HMV Tape Records,” Wireless World Vol. 60 No. 10 (October 1954), p. 512.
- 5: Discussion after delivery of paper by J. G. Frayne and E. W. Templin, “Stereophonic
- Recording and Reproducing Equipment,” Journal of the SMPTE, Vol. 61 p. 405 (September 1953).
- 6: Wireless World Vol. LVII No. 6 (June 1951), page 223.
- 7: W. S. Latham, “Limitations of Magnetic Tape,” New York: Audio Engineering Vol. 36 No. 9 (September 1952), pages 19-20 and 68-69.
- 8: Stanley P. Lipshitz and John Vanderkooy, “Polarity Calibration Tape (Issue 2)”, Journal of the Audio Engineering Society, Vol. 29 No. 7/8 (July/Aug 1981), pages 528 and 530.
- 9: British Standards B.S. 1568:1953 and B.S. 2478:1954. “Magnetic Tape for Domestic and Commercial Recording.”
- 10: S. J. Begun, “Magnetic Recording” Thermionic Products Ltd., 1949, page 156. This is a British reprint of an American book dated June 1948, but I have not been able to find the American publisher.
-